








Finding the right magnetic track light size and wattage for your space isn’t as complicated as it might seem. Essentially, it boils down to understanding your room’s dimensions, the kind of ambiance you’re aiming for, and the specific tasks you’ll be doing under the lights. A good rule of thumb is to think about how much light you need to comfortably see and function, then choose track lengths and light fixtures that collectively achieve that. This guide will walk you through the practical considerations without all the jargon, helping you make informed decisions for perfect illumination.
Understanding Magnetic Track Light Systems
Magnetic track lighting offers a versatile and modern lighting solution, distinct from traditional recessed or fixed fixtures. The core idea is a low-voltage track, often 24V or 48V, that acts as a power conduit. Along this track, various light fixtures Slylamps with magnetic bases can be easily attached, moved, and rearranged. This flexibility is its biggest draw, allowing you to adapt your lighting scheme as your needs or decor change without rewiring.
The Low-Voltage Advantage
One of the key characteristics of magnetic track lighting is its low-voltage operation. Typically, these systems run on either 24 volts or 48 volts, stepping down the standard household 120V or 240V AC power through a transformer. This low voltage brings several benefits. Firstly, it enhances safety, as the risk of electrical shock is significantly reduced compared to line voltage systems. Secondly, it often allows for smaller, more discreet fixture designs, as components don’t need to accommodate higher voltage loads. Lastly, low voltage systems are generally more energy-efficient and can offer greater flexibility in wiring configurations, sometimes allowing for longer track runs without voltage drop issues, depending on the specific system and wire gauge.
Components of a Magnetic Track System
To fully grasp sizing and wattage, it’s helpful to know the basic components. You’ll have:
- The Track: This is the backbone, a linear metal channel, often aluminum, with embedded conductors. It comes in various lengths and can be cut, joined, or even bent (with specific types) to fit your space. Tracks can be surface-mounted, recessed into ceilings, or suspended.
- The Fixtures (Light Heads): These are the individual light sources. They come in many forms – spotlights, floodlights, pendant lights, linear lights – and snap onto the track magnetically, drawing power directly from it. Their wattage and beam angle are crucial for illumination.
- The Power Supply (Driver/Transformer): This component converts your main household AC power to the low DC voltage (24V or 48V) required by the track. It’s usually external to the track, though some smaller systems might integrate it. The power supply’s wattage capacity must exceed the total wattage of all fixtures connected to the track.
- Connectors: These pieces allow you to join multiple track segments into longer runs or create L-shapes, T-shapes, or even square/rectangular patterns. They ensure continuous power delivery across the entire track layout.
- End Caps: Used to finish off the ends of a track run, providing a clean aesthetic and ensuring electrical safety by covering the live conductors.
Understanding these components helps you visualize how the system comes together and how each piece contributes to the overall lighting design and functionality.
Sizing Your Magnetic Track: Length and Layout
The physical size of your magnetic track system is about more than just aesthetics; it directly impacts how well your space is illuminated and the system’s flexibility. It involves considering both the linear length of the track and its overall layout within the room.
Determining Track Length
The ideal track length isn’t a one-size-fits-all answer. Start by measuring the area you want to illuminate.
- For General Illumination: If you’re lighting an entire room, you might consider running tracks along the perimeter, in a grid pattern, or a single long run down the center. A common approach is to cover about 60-70% of the ceiling length or width with track, allowing flexibility for fixture placement. For example, in a 15-foot long room, a 10-foot track might be a good starting point.
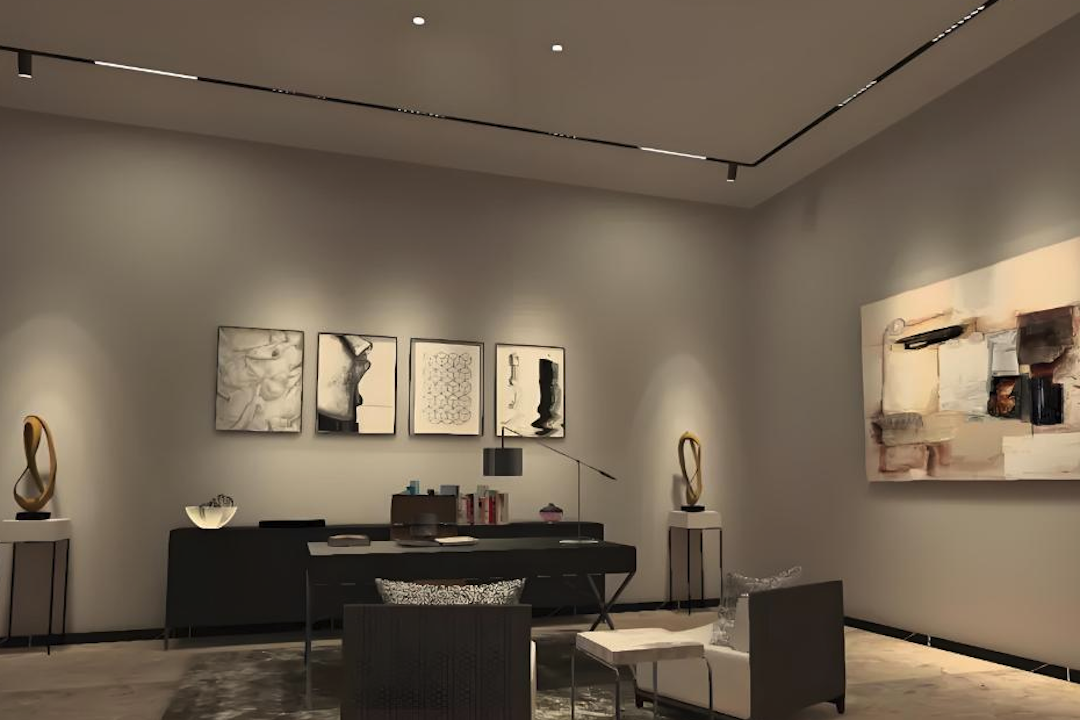
- For Accent Lighting: If you’re highlighting specific features like artwork, shelves, or a display wall, your track length will be dictated by the width of the object or area you want to illuminate. You’ll want enough track to position spotlights effectively from various angles. A track segment slightly longer than the object itself often works well.
- For Task Lighting: Over a kitchen island, workbench, or dining table, the track should typically extend the majority of the length of the surface. This ensures ample light distribution across the entire workspace or eating area. For a 6-foot island, a 5-foot track segment would be appropriate.
Magnetic tracks are commonly available in lengths such as 1 meter (3.3 feet), 2 meters (6.6 feet), and 3 meters (9.8 feet). Many systems allow you to cut the track to precise lengths, offering even greater customization. Always buy slightly more track than you think you need if cutting is an option, just in case of mistakes, or to allow for future expansion.
Planning Track Layouts
The layout of your track system significantly impacts light distribution and visual appeal.
- Single Run: The simplest layout, a single straight line. Ideal for narrow rooms, hallways, or to illuminate a specific linear area like a kitchen counter or a long dining table. It’s unobtrusive and directs light along a single axis.
- L-Shape: Created by joining two track segments with an L-connector. Excellent for corners, wrapping around a seating area, or defining a functional zone within a larger open-plan space. It offers wider coverage than a single run.
- U-Shape or Rectangle/Square: Achieved using multiple segments and various connectors (L and straight/T/cross connectors). These layouts are fantastic for providing comprehensive general illumination in a room or for framing a specific area, like a living room seating arrangement or a retail display. A rectangular layout ensures even light distribution across a defined zone.
- Grid Layout: For very large spaces, multiple parallel or intersecting tracks can form a grid. This maximizes flexibility for fixture placement and ensures uniform illumination across a vast area, often seen in galleries, offices, or large retail environments. While providing maximum versatility, it can be more visually prominent.
When planning your layout, consider where your power source will enter the track. Some tracks have end-feed power connectors, while others allow for center-feed or even invisible power feeds. Always map out your desired layout on paper or using a digital tool before purchasing to ensure you have all the necessary track lengths and connectors.
Wattage Demands: Calculating for Brightness
Understanding wattage is critical for two main reasons: ensuring you have enough light and making sure your power supply can handle the load. Magnetic track light fixtures, like all lights, have a wattage rating, which indicates how much power they consume.
Lumens vs. Watts: The Modern Perspective
While wattage tells you power consumption, it doesn’t directly tell you how bright a light is anymore, thanks to LED technology. The true measure of brightness is lumens.
- Lumens (lm): This is the total amount of visible light emitted by a light source. The higher the lumen count, the brighter the light. For example, an older 60W incandescent bulb might produce around 800 lumens, while a modern LED bulb can achieve 800 lumens using only 8-10 watts.
- Watts (W): This measures the amount of electrical power consumed by the light fixture. In LED track lighting, fixtures typically range from 5W for a small accent spotlight to 30W or more for powerful floodlights or linear modules.
When choosing fixtures, focus on the lumens needed for your space and task, then check the associated wattage to ensure compatibility with your power supply.
Determining Required Lumens for Your Space
Calculating the exact lumens needed can be complex, involving room reflectance and ceiling height. However, a good practical guideline is to consider the square footage of your room and the intended use.
- General Ambient Lighting: For comfortable, everyday living, aim for 10-20 lumens per square foot for areas like living rooms, bedrooms, and hallways. A 100 sq ft room would need 1000-2000 lumens.
- Task Lighting (e.g., Kitchen Counters, Home Office, Reading Nooks): These areas require more focused and brighter light, targeting 30-50 lumens per square foot directly over the task area. For a 10 sq ft kitchen counter, you’d want 300-500 lumens concentrated there.
- Accent Lighting (e.g., Artwork, Decorative Elements): This is highly subjective, but typically you’d want fixtures that provide enough lumens to make the accent stand out, often 3-5 times brighter than the surrounding ambient light. Spotlights with narrower beam angles are common here.
You don’t need to hit these numbers precisely, but they provide a useful starting point for selecting fixtures. A combination of general lights, task lights, and accent lights on your track will provide the most versatile and effective illumination.
Calculating Total Wattage for Your Power Supply
Once you’ve selected your fixtures based on their desired lumen output and beam angle, sum up their individual wattages.
Total Fixture Wattage = (Wattage of Fixture 1) + (Wattage of Fixture 2) + …
Now, you need to select a power supply (driver/transformer) with sufficient capacity. It’s crucial to leave a safety margin to prevent overloading the driver and to allow for future additions. A common recommendation is to choose a power supply with a capacity that is at least 20-25% higher than your total calculated fixture wattage.
Required Power Supply Wattage = Total Fixture Wattage x 1.25
For example, if you plan to install five 10W spotlights, two 15W linear lights, and one 20W floodlight:
- Total Fixture Wattage = (5 10W) + (2 15W) + (1 * 20W)
- Total Fixture Wattage = 50W + 30W + 20W = 100W
- Required Power Supply Wattage = 100W * 1.25 = 125W
So, you would need a power supply rated for at least 125W. Power supplies are available in various capacities (e.g., 60W, 100W, 150W, 200W, 300W). Always round up to the next available standard power supply size.
Remember, the track itself usually has a maximum wattage rating (e.g., 300W, 500W per run), which the power supply should also not exceed. This information is typically provided by the manufacturer.
Choosing the Right Fixtures: Beyond Basic Wattage
Once your track length and total wattage are sorted, it’s time for the fun part: selecting the actual light fixtures. This is where you fine-tune your illumination to perfectly match your space and needs. It’s not just about how many watts; it’s about what kind of light each fixture provides.
Types of Magnetic Track Light Fixtures
Magnetic track systems offer a wide array of fixture types, each serving a different purpose.
- Spotlights: These are the most common and versatile. They emit a narrow, focused beam of light, ideal for accentuating artwork, architectural features, or specific objects. Their beam angles can range from very narrow (15-25 degrees) for precise highlighting to medium (30-45 degrees) for broader accents. Many are adjustable, allowing you to direct the light where needed.
- Floodlights / Downlights: Designed for broader light distribution, often with wider beam angles (60-120 degrees). They are excellent for general ambient lighting, illuminating larger areas, or providing task lighting over surfaces like kitchen islands or workbenches where a wide, even spread is desired. Some systems offer recessed-style floodlights that sit flush with the track.
- Linear Lights / Grille Lights: These fixtures provide a continuous, even strip of light. They are fantastic for modern, minimalist aesthetics and excel at providing general ambient illumination, often replacing the need for multiple smaller spotlights. They come in various lengths (e.g., 30cm, 60cm, 100cm) and can be used to create a wash of light across a wall or ceiling.
- Pendant Lights: Just like traditional pendants, these hang down from the track, offering a decorative element as well as focused light. They are perfect for illuminating dining tables, breakfast bars, or creating visual interest in a room. Available in various styles and lengths, they add a sculptural touch to your lighting scheme.
- Wall Washers: Specifically designed to create a uniform wash of light across a vertical surface, such as a wall or a gallery display. They have a unique optical design that spreads light evenly from top to bottom, minimizing hot spots or dark patches.
Mixing and matching these types allows for a layered lighting design, providing both functional and aesthetic benefits.
Beam Angle: Directing the Light
The beam angle of a fixture is crucial for controlling where the light goes. It’s the spread of light emitted from the source.
- Narrow Beam (10-25 degrees): Ideal for highly focused accent lighting. Think highlighting a small sculpture, a framed photo, or creating dramatic contrasts. If you want to make something “pop,” a narrow beam is your friend.
- Medium Beam (30-45 degrees): A versatile choice for broader accent lighting, illuminating larger pieces of art, or providing targeted task lighting over a specific area. It offers a good balance between focus and spread.
- Wide Beam (60+ degrees): Best for general ambient lighting or illuminating larger task areas where a broad, even light is preferred. Floodlights and downlights typically have wide beams.
Consider the distance between your light source and the surface you’re illuminating. A narrow beam will create a smaller, more intense circle of light from a distance, while a wide beam will cover a much larger area with less intensity. Many track fixtures offer interchangeable lenses or adjustable beam angles to fine-tune this aspect.
Color Temperature (CCT): Setting the Mood
Color temperature, measured in Kelvin (K), describes the warmth or coolness of the light emitted. It significantly impacts the mood and atmosphere of a space.
- Warm White (2700K – 3000K): Emits a soft, yellowish light similar to traditional incandescent bulbs. Ideal for living rooms, bedrooms, and dining areas where a cozy, inviting, and relaxing ambiance is desired.
- Neutral White / Cool White (3500K – 4500K): A more balanced light, closer to natural daylight. Excellent for kitchens, bathrooms, home offices, and retail spaces where clarity, focus, and accurate color rendition are important. It’s often chosen for task-oriented areas.
- Daylight (5000K – 6500K): A very bright, bluish-white light, mimicking overcast daylight. While energizing, it can feel sterile in residential settings. More commonly used in commercial spaces, workshops, or areas where very high visibility is required.
Most residential magnetic track systems will offer fixtures in the 2700K-4000K range. Consistency in color temperature across your space is generally recommended unless you’re intentionally creating distinct lighting zones.
Practical Installation and Dimming Considerations
Getting your magnetic track system up and running involves a few practical steps, and incorporating dimming functionality can greatly enhance its versatility. It’s about ensuring a safe, functional, and controllable lighting scheme.
Installation Basics
While magnetic track systems are designed for relatively easy installation, especially compared to hardwired recessed lighting, certain aspects require attention.
- Mounting the Track:
- Surface Mounted: The most straightforward. Tracks are screwed directly to the ceiling or wall. Ensure you use appropriate anchors for your ceiling material (e.g., drywall anchors, wood screws into joists). Always pre-drill pilot holes.
- Recessed Mounted: Requires a channel to be cut into the ceiling or wall, and the track is then flush-mounted. This offers a very clean, integrated look but is more complex and often done during new construction or significant renovations. Special brackets or clips are usually required.
- Suspended: Tracks hang from the ceiling using suspension cables. Ideal for high ceilings or when you want to bring the light source closer to the task area, or simply for a modern, industrial aesthetic. Requires sturdy ceiling attachment points for the cables.
- Wiring the Power Supply: This is the most critical electrical step.
- Locating the Driver: The power supply (driver/transformer) converts line voltage (120V/240V AC) to low voltage (24V/48V DC). It can be integrated into the track itself (less common for larger systems), mounted externally nearby, or even placed remotely in a ceiling void or junction box.
- Connecting to Main Power: This part usually requires connecting to your household’s electrical circuit. If you’re not comfortable with electrical wiring, it’s highly recommended to hire a qualified electrician. Ensure the power is OFF at the breaker before making any connections.
- Connecting to the Track: The low-voltage output from the driver connects directly to the track’s power input connector. This connection is typically simpler and safer due to the low voltage.
- Inserting Fixtures: Once the track is powered, simply snap the magnetic fixtures onto the track anywhere you desire. They will instantly make electrical contact. This is the beauty of magnetic systems – effortless adjustment.
Always follow the manufacturer’s specific installation instructions, as details can vary between brands and models.
Dimming Capabilities
The ability to dim your magnetic track lights is a game-changer for creating different moods and saving energy.
- Driver Compatibility: The most important factor for dimming is the power supply (driver). Not all drivers are dimmable, and those that are often require a specific dimming protocol. Look for drivers explicitly labeled as “dimmable.”
- Dimming Protocols:
- TRIAC/Phase-Cut Dimming: This is the most common type of dimming for residential systems, using standard wall dimmers. Ensure both your driver and your dimmer switch are compatible with this method.
- 0-10V Dimming: More common in commercial or larger residential systems, offering smoother dimming and precise control. Requires a specific 0-10V dimmer and driver.
- DALI (Digital Addressable Lighting Interface): A more advanced digital dimming protocol, allowing individual control and addressing of fixtures. Often found in smart home or sophisticated commercial installations.
- Bluetooth/Zigbee/Wi-Fi Dimming: Many modern systems integrate smart home connectivity, allowing dimming and control via apps or smart assistants. This requires compatible fixtures and/or drivers.
Smart Home Integration
Many magnetic track lighting systems are now designed with smart home integration in mind, or can be made smart through compatible drivers and controllers.
- Wireless Control: Using Wi-Fi, Bluetooth, or Zigbee protocols, you can control your track lights via a smartphone app, tablet, or voice assistant (like Alexa, Google Assistant).
- Scheduling and Scenes: Smart systems allow you to set schedules for when lights turn on/off, and create “scenes” – predefined lighting settings (e.g., “Movie Night” with dimmed, warm lights, or “Work Mode” with brighter, cooler lights) that can be activated with a single command.
- Automation: Integrate your lights with other smart devices. For example, lights could turn on automatically when you enter a room (with motion sensors) or adjust based on natural daylight levels.
When planning for dimming or smart integration, specify these needs from the outset to ensure you select the correct compatible power supplies, fixtures, and control modules. This upfront planning will save you headaches and ensure your system meets all your desired functionalities.